How to get the most out of your point and shoot camera
I hope you like my little guide to getting more out of the humble point and shoot camera.
First principles
Open the packaging and locate the quick guide to ensure that everything is in the box. A quick look just to confirm how to insert the batteries and memory card correctly. Maybe another quick glance at the guide and we´re ready for action.
That´s the way most of us deal with our new camera and the manual plus packaging is consigned to the cupboard, after removing the software cd and usb lead should there be one of course. It´s a point and shoot camera and has been designed to be as easy to use as possible so why read the manual. It´s just wasting time and not much fun.
That´s great but what if you´ve taken thousands of shots and you feel like you want to get more out of your photography? Some of you may decide to upgrade to a more ´serious´ camera with more features and greater resolution but is this really the answer? Upgrading can be expensive and the results can be no better that those of your original.
Before taking the upgrade route take the time to find and dust off the manual for your camera to find out what all those buttons and settings are really for. The manual does not make an exciting read but it does contain some useful information for those of us who have been using one mode (auto) for taking photos. We may have toyed with the other settings of the camera without the knowledge of what the purpose is for and ended up with a few bad shots which convinced us to go back to the all powerful ´automatic everything´ mode. The fact of the matter is that the full automatic mode and ignorance of the other settings on your camera are the real enemy of your photography. Reading the manual will help you to understand that this mode just allows the camera to make decisions about what you are trying to do which is never that great. You won´t be able to have full control over the actions of the camera but you will be able to go some of the way to making the camera work for you rather than the other way around once you master each mode or preset.
Don´t be afraid to fill up the memory card with shots while reading the manual since all this is costing is a small percentage of battery power and the card can be wiped clean again once it´s been filled. If you try a different mode and the results are not what you expected then take another quick look at the manual just to make sure that the mode you have selected is for that purpose.
This is all part of getting to know your camera and it´s capabilities. Taking lots of shots in the various modes when you don´t necessarily need to could be the difference between getting that all important shot when you want it or missing it completely.
Flash? Just say no.
The modern compact point and shoot camera is just that, compact. It´s designed to be carried anywhere and with this comes another compromise. The flash has to be right by the lens and this means that the light of the flash shoots forward, parallel to it in order to illuminate the subject. The result is often a flat looking shot which has very little shadow and lacks a certain depth. Objects close to the flash are bleached while those further away suffer from a lack any meaningful illumination becoming dark in inconsistent. It´s okay for a snapshot but not great for anything more.
The answer to this is to avoid using the flash, where ever possible, and learn to use natural lighting and different modes of your camera as a work around for not using it. To compensate for the slower shutter speeds that these presets use and to prevent blurring of the shot, you will need to rest the camera on something or to brace your arms while breathing correctly. You´d have to do the same if you were using a DSLR anyway. Getting used to how your camera reacts to less than perfect light will give you a better idea of which mode you need to select based on the available light.
The flash does have it´s uses and this is for situations where the subject is taken against a strong backlight. The human eye is capable of distinguishing the difference but most cameras will compensate for the background by making the subject almost black. Here the flash is used to illuminate the subject so that it can be seen and a better overall composition is achieved.
You can also diffuse the flash by placing tissue paper or semi-opaque material reducing its power and getting a softer illumination from it. Since the camera software has no way of knowing that we have done this it assume settings for the usual strong flash and the resulting shot will be underexposed to varying degrees. This is not a real problem as we are able to correct this using photo editing software. It is more difficult to correct an overexposed photograph than to correct an underexposed one due to the tonal qualities and bleaching effects.
Another thing that you can do is to use a credit card/white plastic card in front of the flash in order to bounce the light up and away from the lens. This will work if you have something to further bound the light off of like a low white ceiling. The technique is of no use when in an outdoor situation with nothing above the camera. Not all cameras will allow you to do this but with a little experimentation and ingenuity you could probably come up with a practical solution even for a non pop-up type flash.
Center of attention
There is no real reason to stop taking snap shots which present an nicely framed picture of our subject but if you want to start experimenting with photos that are a bit different and have that eye drawing quality? How do you go about this? The answer is quite simple really and comes from a thing called the ´rule of thirds´. This is a concept of visualising the screen as being overlaid by a tick tack toe grid. Nine squares formed by 2 vertical and 2 horizontal lines. Some cameras provide this visual reference on the screen for you but for others you´ll need to use your imagination. The purpose of this grid is to help you get away from shots where the object and/or horizon are slap bank in the middle of the screen dividing the resulting photo into two halves. If you were to place, for example, the horizon on the lower line then the shot would gain an extra dimension by getting the person viewing it to look around the photograph rather than just dead center as they usually expect to. Placing the subject on one of the vertical lines or intersections enhances the effect and depth of the shot as well. In one step you have achieved something different from the center stage shot and something that you and other will hopefully appreciate more. The technique will also get you thinking while setting up the shot by making you decide what you should or shouldn´t include when framing the shot.
It´s time to get down and dirty!
It´s a fact of life that we are on average around five and a half feet tall, give or take a few inches so it stands to reason that most photographs are take by us at head height. Since this is the case then most of these shots have the same old, same old quality. What can you do about this to make your masterpieces stand out. Well as the heading suggests, it´s time to get down and dirty!
There is no rule that say we must stand and place the camera directly in front of our faces in order to take a shot but I suspect it´s done because we don´t want to look silly to others if we break away from this. The fact is that professional photographers have no such qualms and really why should they? They work to get the shot even if it means lying on the floor or climbing a street lamp. With this in mind then try taking your next shots from different angles, be that pro, and see what a difference a bit of climbing, kneeling and twisting can make to then shot. Photographs of children and animals can take on a new life if you get down to their level and see the world from that height.
Bag of tricks
Each point and shoot camera will come with a varying range of features some useful and some not so useful when you want to get more out of it.
The optical zoom on your camera, where the lens moves in and out mechanically to focus on your subject, is the only zoom mode you should ever need to use. The digital zoom function is something that you can replicate using photo editing software because the digital zooms results are often very poor. The reason for this is that the digital zoom feature takes over when the optical zoom has reached its maximum capability and any further zooming is carried out by the software on the camera trying to mimic the optical zooms capability. Photo editing software will most likely do a better job at this for you because it is far more powerful and capable of doing the job with the added bonus of being easier to use via the mouse and larger screen.
Back at the beginning I mentioned about the modes of the camera and the all powerful automatic mode. The automatic mode is usually where you will find all of your cameras ´important´ little features, the ones that once you get used to using you camera you will not need to use again. Face recognition, smile and blink recognition etc. Knowing what your preset modes, like portrait, landscape and sport etc., are all about allows you to making a decision on which to use based on what kind of shot you want to take and the available conditions. The sports preset incorporates a higher shutter speed and allows you to focus on your subject while panning the camera about. Landscape presets allow for a greater depth of field to make the foreground and background remain in focus.
Since the point and click camera is not as versatile as a DSLR camera in terms of manual modes and adjustments to aperture and shutter speed, it is through the clever use of these presets that you will be able to get more from your camera and go some way to mimicking the adjustments of a DSLR. The portrait mode can be used for taking portraits but it can also be used in situations where you want to isolate objects in the foreground and unfocus the scene behind it. The reverse is true of the landscape mode where you can have everything in the shot focused. Experimentation is the key to learning how to trick the camera into producing the shots you want and getting away from the camera doing it´s own thing.
Focus, Focus, Focus
One of the great little features of your compact point and click camera is its auto focus feature where you point the lens at something and then press the button to it´s halfway mark. Once you get your focus indicator on you screen you´re good to depress the button fully and take the shot. Simple enough isn´t it? The only problem with this is that like with all cameras the focusing point is dead in the center of the lens so how do you get your focus when you have set-up a shot using the rule of thirds and you want the subject in the right or left of the shot to be in sharp focus and not something in the center of the screen that´s in the distance. It´s very easy and logical to achieve this by first lining up your subject in the center of you lens and pushing the button to it´s halfway point to achieve your desired focus on the subject. While still holding the button at it´s hallway point you then move the camera to where you want it to point so that your thirds shot is created. Now push the button all the way down and you´ve achieved your shot. One word about depth of field here is to mention that in order for you camera to accurately calculate the aperture and so provide the correct depth of field you will need to do you initial focusing on something on the subject that is not pure black or white and that is roughly 19% grey. Another point to note about this technique is that it will not work in some camera modes where the lens continually focuses such as a macro mode or sports mode since once you have you initial focus the camera will then try to focus again on what is in the center of the lens once you move you camera.
A new lease of life
Well that´s it for now and hopefully you will now be able to get more out of your compact. Please remember that taking photographs is all about you and what you put into it. Don´t be afraid to fill those memory cards and always be prepared to try something new.
Exposure and correcting it through digital editing
This is a quick rundown and technique for dealing with the question of exposure in digital photography. It is not meant to be an in-depth article which I´ll hopefully deal with at a later date for those of you who are interested in more advanced techniques. This is a simple guide.
What is exposure?
Exposure is more or less the balance of light and dark within a shot and when these two elements are correctly balanced then the shot is correctly exposed. The problem here is that it is not always simple to get the exposure right and sometime we don´t discover this until we get back to the computer to review our work. As we gain more experience we learn that certain conditions and set-ups affect the expose of the shot more than others and this is where we need to compensate at the time of taking our shot.
If your camera has a bracketing setting then this is something that can be used to take s series of shots at different exposures in order to overcome difficult situations. If you don´t have this luxury then you can deliberately alter the camera settings in order to take shots around what you suspect to be the correct exposure levels. If in doubt then elect to underexpose you shots rather than to overexpose them. The reasoning behind this can be summed up with an analogy of the exposure of a celebrity. If a celebrity is overexposed then the public becomes blind to what they are doing and they are consigned to the shelf until things die down a bit. With underexposure then the celebrity and their team can do a lot more to increase their exposure and bring them into the limelight.
Just like in the celebrity example, over exposure of a shot makes it far more difficult to do anything with it. A lot of the pictures data has been whited out and details within those regions effectively lost. On the other hand an image that has been under exposed, while appearing dark and indistinct, still contains most of the images data however it is just hidden under a mass of shadows.

In this example the two cats are photographed by the side of our house. It was a bright sunlight day and the resulting shot ended up being overexposed and the detail of the doorway the Rocky (left) is sitting in is lost.

The same set-up but this time the exposure is just about right. I don´t think Luna (right) has moved.
Should I care?
What´s the difference between the two example above? Essentially it´s the detailing in the wall and the door frame which have been bleached out in the overexposed image.
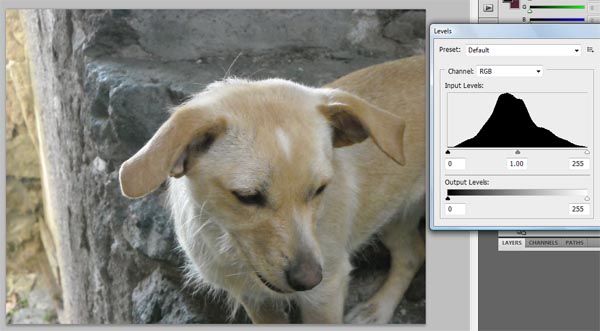
In this picture of Lily, the exposure is pretty much spot on with most of the images information is appearing to be a nice bell curve when viewing the levels in Photoshop (Image, Adjustments, Levels or Ctrl. L). Considering the set-up of the shot it worked out well I think.
Hopefully you´ll now be able to see why an underexposed image is better to work on and with this in mind I´ll move on to show you how you can quickly bring that underexposed image to life in Photoshop.
Fixing underexposure in Photoshop

As you can see this image is dark and under exposed even though the shot was taken on a nice bright day. The shot was taken before the camera sensor had time to adjust and compensate for the correct lighting of the scene.
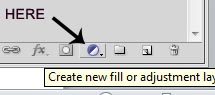
To correct this, open the image in Photoshop and then click on the Add new adjustment layer in the layers tool window (below) and select Levels from the menu.
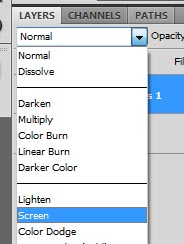
Once you do this there will be no difference to the image on your screen so don´t worry that you didn´t do this step correctly. The difference will be seen when you click on the down arrow next to the word normal and select ´Screen´ from the list as shown below.
The effect is immediately apparent with the lightening of the whole image. In most cases a single adjustment layer should suffice but if it doesn´t then add another one until you judge that the image is just about right.
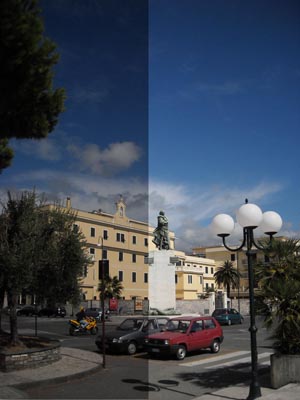
As you can see from my half and half example below, the more or less correct exposure has been achieved after the addition of just one adjustment layer.
As with everything the correct exposure level is a subjective quality that you will have to judge for yourself. Also you need to bear in mind that this is a quick fix for an image. If the image was an important piece of work for me then I would have gone through a different more time consuming route in order to achieve the best possible result.
One of the problems inherent in this technique is that with overly dark or dramatically underexposed images then there may be an unacceptable amount of noise within the corrected image.
In another article I´ll examine a technique to reduce this noise and blend it into the shot.
Digital zoom vs digital photo editing
As promised, and to reinforce what I said about your cameras digital zoom capabilities in my article on point and shoot cameras, this is a short article on why you should disable, if you can, or not use the digital zoom on your camera.
When discussing the digital zoom it is important to point out that the digital zoom does not capture any more detail than your optical zoom has already captured. It gives the illusion of a higher zoom level by adding pixels/detail to the image through a process called interpolation. The software on the camera is making it´s best guess as to the detail those pixels would have contained had a conventional optical zoom captured the image. Photo editing software does the same thing when resampling or up-sampling a capture.
The inherent problem lies in the fact that with the digital zoom on your camera once the shot is taken you can´t zoom back out if you discover that the resulting image is of such poor quality as to be not worth it. You also cant remove any problems caused by the high zoom level and potential camera shake that enters into the equation.
With photo editing software you may be working with an image that is captured using the cameras maximum optical zoom and then cropping and resampling the image data in order to zoom in on a particular feature. The immediate advantage is that if your vision of this ´zoom´ didn´t work out then you´ve lost nothing because you still have the maximum zoomed original. Many programs have a variety of different processes to resample an image which offer better results depending on the subject matter.
While photo editing software will not magically gain you more detail it does give you distinct advantages over the cameras digital zoom so this method should be favoured for better results.
For better results then you would need to look at a higher megapixel camera, higher optical zoom or a telephoto lens but that is a whole other story.